
The Complete Guide to the .claude Folder
Don't want to figure this out alone? I walk members through every step inside the community. Join the Skool → skool.com/raycfu
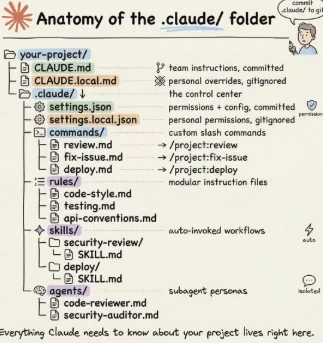
PART 1: WHAT THE .CLAUDE FOLDER ACTUALLY IS
Every time you start a Claude Code session, the very first thing it does is look for the .claude folder in your project. If it finds one, it reads every configuration file inside it before doing anything else. These files tell Claude how to behave, what it is allowed to do, what it should never do, and how your project works.
Think of it like onboarding a new developer. When someone joins your team, you do not just throw them into the codebase and hope for the best. You tell them: here is how we structure things, here is how to run tests, here are the things that will break if you touch them wrong, and here is the stuff you should never do. The .claude folder is that onboarding document for Claude.
Without it, Claude is guessing. It will use patterns it learned from training data that may have nothing to do with your project. It will run commands you did not want it to run. It will structure code in ways that do not match your conventions. It will make decisions that you then have to correct over and over again.
With a properly set up .claude folder, Claude works like a team member who actually read the docs.
PART 2: THE TWO FOLDERS YOU NEED TO KNOW ABOUT
There are actually two .claude directories, not one. This trips people up.
The first one lives inside your project root. This is the team-level configuration. You commit it to git. Everyone on the team gets the same rules, the same commands, the same permission policies. When someone clones the repo, they get the full Claude configuration along with the code.
The second one lives in your home directory at ~/.claude/. This is your personal configuration. It holds your preferences, your session history, your auto-memory, and any global settings you want applied across every project you work on. This never gets committed to any repo.
When Claude starts a session, it reads both. The project-level files take priority for project-specific things, but your personal global files fill in everything else.
The rest of this guide will tell you exactly what goes in each one.
PART 3: CLAUDE.md (THE MOST IMPORTANT FILE)
If you only set up one thing from this entire guide, make it this file.
CLAUDE.md sits at your project root (not inside the .claude folder, right at the top level of your repo). When Claude Code starts, it loads this file straight into the system prompt and keeps it in context for the entire conversation.
Whatever you write in CLAUDE.md, Claude will follow. If you say "always write tests before implementation," it will. If you say "never use console.log for error handling, always use the custom logger module," it will respect that every single time.
This is not a suggestion box. This is an instruction manual. Claude treats it as the authoritative source of truth for how your project works.
You can also have a CLAUDE.md inside subdirectories for folder-specific rules. Claude reads all of them and combines them. So if you have one at the project root and another inside src/api/, Claude will load both when working in that API folder.
PART 4: WHAT TO PUT IN CLAUDE.md (WITH EXAMPLES)
Most people either write too much or too little. Both cause problems. Too little and Claude does not have enough context to make good decisions. Too much and it starts eating into your context window, which actually makes Claude worse because it has less room to think about your actual task.
The sweet spot is under 200 lines. Ideally closer to 50.
Here is what belongs in CLAUDE.md:
BUILD, TEST, AND LINT COMMANDS The exact commands to run your project. Not a link to a README. The actual commands.
npm run dev (what it does) npm run test (what framework, any setup needed) npm run build (what it outputs) npm run lint (what tools it uses)
Claude needs to know these so it can verify its own work, run tests, and catch problems before you do.
ARCHITECTURE DECISIONS The big structural choices that are not obvious from the code alone. Things like: "We use a monorepo with Turborepo." "All API routes live in src/handlers/." "Shared types go in src/types/." "We use Prisma as our ORM, not raw SQL."
These prevent Claude from inventing its own structure that conflicts with yours.
NON-OBVIOUS GOTCHAS The things that trip up every new person on the team. "TypeScript strict mode is on, unused variables are errors." "Tests use a real local database, not mocks. Run npm run db:test:reset first." "The CI pipeline fails if any file has more than 300 lines."
These are the things Claude would never know without you telling it.
CONVENTIONS Your team's style preferences that go beyond what a linter catches. "Use zod for request validation in every handler." "Return shape is always { data, error }." "Never expose stack traces to the client." "Prefer named exports over default exports."
Here is a real example of a CLAUDE.md that covers everything without being bloated:
Project: Acme API
Commands
npm run dev # Start dev server (port 3000) npm run test # Run tests (Jest, needs local DB) npm run lint # ESLint + Prettier npm run build # Production build to dist/ npm run db:test:reset # Reset test database (run before tests)
Architecture
- Express REST API, Node 20, TypeScript strict mode
- PostgreSQL via Prisma ORM
- All handlers in src/handlers/
- All middleware in src/middleware/
- Shared types in src/types/
- Business logic in src/services/ (handlers call services, never raw DB)
Conventions
- Use zod for request validation in every handler
- Return shape is always { data, error }
- Never expose stack traces or internal errors to the client
- Use the logger module from src/utils/logger.ts, never console.log
- All async handlers wrapped in asyncHandler middleware
- Prefer named exports over default exports
- Database calls only happen inside src/services/, never in handlers
Watch Out
- Tests use a real local DB, not mocks. Run db:test:reset first.
- Strict TypeScript: no unused imports, no unused variables, no any
- CI fails on files over 300 lines, split large files proactively
- The auth middleware reads from req.user, not req.body.user
That is about 30 lines. It gives Claude everything it needs without wasting context on things it can figure out on its own.
WHAT DOES NOT BELONG IN CLAUDE.md
Anything that already lives in a linter or formatter config file. Claude can read your .eslintrc and .prettierrc directly. Do not duplicate those rules.
Full documentation. If you have a 50-page architecture doc, do not paste it in. Link to it if necessary, or put the most critical parts in a rules file (covered later).
Long paragraphs explaining theory or philosophy. Claude does not need a five-paragraph essay on why you chose Express over Fastify. It just needs to know you use Express.
Anything over 200 lines. When CLAUDE.md gets too long, Claude's instruction adherence actually drops. It is counterintuitive but real. A focused 50-line file works better than a comprehensive 400-line one.
PART 5: CLAUDE.local.md (YOUR PERSONAL OVERRIDES)
Sometimes you have a preference that is specific to you, not the whole team. Maybe you like Claude to explain its reasoning before making changes. Maybe you want it to always show diffs before writing files. Maybe you have a personal test command that differs from the team standard.
Create a file called CLAUDE.local.md in your project root (same level as CLAUDE.md). Claude reads it alongside the main CLAUDE.md, and it is automatically gitignored so your personal tweaks never land in the repo.
Example:
Personal preferences
- Always explain your reasoning before making changes
- Show me a diff summary before writing to any file
- When writing tests, start with the edge cases first
- I prefer verbose variable names over short ones
This is entirely optional. Most people do not need it. But if you find yourself constantly correcting Claude on the same personal preference, put it here once and stop repeating yourself.
PART 6: THE RULES/ FOLDER (MODULAR INSTRUCTIONS THAT SCALE)
CLAUDE.md works great when your project is small. But once your team grows or your project gets complex, you end up with a 300-line CLAUDE.md that nobody maintains and everyone ignores.
The rules/ folder solves this.
Every markdown file inside .claude/rules/ gets loaded alongside your CLAUDE.md automatically. Instead of one giant file, you split instructions by concern:
.claude/rules/ code-style.md testing.md api-conventions.md security.md database.md
Each file stays focused. The team member who owns API conventions edits api-conventions.md. The person who owns testing standards edits testing.md. Nobody stomps on each other. Pull requests that change rules are easy to review because you can see exactly which concern was modified.
Example of a testing.md rules file:
Testing Standards
- Every handler must have at least one happy-path test and one error-path test
- Use factories (src/test/factories/) to create test data, never hardcode
- Tests run against a real local database, not mocks
- Always reset the DB before each test suite with beforeAll(() => resetTestDB())
- Integration tests go in tests/integration/, unit tests go next to the file they test
- Test file naming: [filename].test.ts
- Never test implementation details, test behavior
- If a test needs more than 50 lines of setup, the code under test probably needs refactoring
Example of a security.md rules file:
Security Rules
- Never log sensitive data (tokens, passwords, PII)
- All user input must be validated with zod before use
- SQL queries only through Prisma, never raw SQL strings
- Never expose stack traces in API responses
- Rate limiting is required on all public endpoints
- Authentication middleware must be applied to all non-public routes
- File uploads must validate MIME type and size before processing
- Never store secrets in code, always use environment variables
These files load automatically. You do not need to reference them anywhere. Just put them in .claude/rules/ and Claude reads them.
PART 7: PATH-SCOPED RULES (LOAD RULES ONLY WHEN RELEVANT)
This is where rules get really powerful.
You can add a YAML frontmatter block to any rule file that tells Claude to only load that rule when it is working with matching files. If Claude is editing a React component, it does not need to know your API conventions. If it is working on a database migration, it does not need your frontend testing rules.
Example:
paths:
- "src/api/**/*.ts"
- "src/handlers/**/*.ts"
API Design Rules
- All handlers return { data, error } shape
- Use zod for request body validation
- Never expose internal error details to clients
- All handlers must use the asyncHandler wrapper
- Response status codes: 200 for success, 201 for creation, 400 for bad input, 401 for auth, 404 for not found, 500 for server errors
Claude will only load this file when it is touching files inside src/api/ or src/handlers/. Any other time, these rules do not exist as far as Claude is concerned. This keeps Claude's context clean and focused.
Another example for frontend-specific rules:
paths:
- "src/components/**/*.tsx"
- "src/pages/**/*.tsx"
Frontend Rules
- Use functional components with hooks, never class components
- All components must have TypeScript props interfaces
- Use Tailwind utility classes, never write custom CSS
- Extract reusable logic into custom hooks in src/hooks/
- Loading and error states are required for every async component
Rules without a paths field load unconditionally, every session. Use that for project-wide rules. Use path scoping for rules that only matter in specific parts of the codebase.
PART 8: settings.json (PERMISSIONS AND CONTROL)
The settings.json file inside .claude/ is your permission system. This is where you define what Claude can do without asking, what it can never do, and what requires your approval first.
This file is also where your hooks configuration lives, but we will cover hooks in their own section.
Here is a basic settings.json:
{ "$schema": "https://json.schemastore.org/claude-code-settings.json", "permissions": { "allow": [ "Bash(npm run *)", "Bash(git status)", "Bash(git diff *)", "Bash(git log *)", "Read", "Write", "Edit", "Glob", "Grep" ], "deny": [ "Bash(rm -rf *)", "Bash(curl *)", "Bash(wget *)", "Bash(git push )", "Bash(git checkout main)", "Bash(docker rm )", "Read(./.env)", "Read(./.env.)", "Read(./secrets/)" ] } }
The $schema line at the top enables autocomplete and inline validation in VS Code or Cursor. Always include it.
PART 9: THE ALLOW LIST, DENY LIST, AND THE MIDDLE GROUND
The allow list contains commands that Claude can run without asking you for permission. These should be safe, non-destructive operations that Claude needs to do its job.
Good things to allow:
- Your build, test, and lint scripts (npm run *, make *, yarn *)
- Read-only git commands (git status, git diff, git log)
- File operations (Read, Write, Edit, Glob, Grep)
- Language-specific tools (npx tsc --noEmit for type checking, npx jest for tests)
The deny list contains commands that are blocked entirely. Claude cannot run these no matter what. Even if it thinks it needs to, even if you ask it to. The deny list is a hard wall.
Good things to deny:
- Destructive shell commands (rm -rf, drop table)
- Network commands that could leak data (curl, wget to arbitrary URLs)
- Dangerous git operations (git push --force, git checkout main, git reset --hard)
- Reading sensitive files (.env, secrets/, credentials/)
- Docker commands that delete things (docker rm, docker system prune)
Anything that is not in either list falls into the middle ground. Claude will ask you for permission before running it. This is intentional. You do not need to anticipate every possible command. The middle ground gives you a safety net where Claude says "I want to run this, is that okay?" and you decide in the moment.
The philosophy: be generous with the allow list for things Claude needs to do its job well (running tests, reading files, checking types). Be strict with the deny list for things that could cause real damage. Let everything else default to asking.
PART 10: settings.local.json (PERSONAL PERMISSION OVERRIDES)
Same idea as CLAUDE.local.md but for permissions. Create .claude/settings.local.json for permission changes you want locally but do not want committed to the repo.
Maybe you want to allow a specific deployment command on your machine but not on everyone else's. Or maybe you want to add an extra deny rule because you have a local database with production data in it.
This file is auto-gitignored. Your personal security preferences stay personal.
PART 11: THE HOOKS SYSTEM (DETERMINISTIC CONTROL)
This is the section that changes everything once you understand it.
CLAUDE.md instructions are good. Claude follows them most of the time. But "most of the time" is not good enough for certain things. You cannot rely on a language model to always run your linter, always avoid dangerous commands, or always run tests before saying "done."
Hooks make these behaviors deterministic. They are shell scripts that fire automatically at specific points in Claude's workflow. Your script runs every single time, no exceptions. It is not a suggestion. It is a guarantee.
The difference between CLAUDE.md and hooks: CLAUDE.md says "please run prettier after editing files." Claude will do it 90% of the time. A hook says "run prettier after every file edit." It happens 100% of the time.
CLAUDE.md says "never run rm -rf." Claude will avoid it 99% of the time. A hook says "if the command contains rm -rf, block it." It gets blocked 100% of the time.
For things where "almost always" is fine, use CLAUDE.md. For things where "always" is required, use hooks.
All hook configuration lives in settings.json under a hooks key. Here is the critical thing to understand: hooks use exit codes to control what happens.
Exit code 0: Success. Everything is fine. Continue. Exit code 1: Error, but non-blocking. It logs the error and continues anyway. Exit code 2: Block. Stop everything. Send the error message back to Claude so it can self-correct.
The single most common mistake people make with hooks is using exit code 1 for security. Exit 1 does NOT block the action. It logs an error and moves on. If you want to actually prevent something from happening, you must use exit code 2. This is worth repeating because getting it wrong means your security hook is doing nothing.
PART 12: HOOK EVENTS AND WHEN THEY FIRE
There are several events you can hook into. Here are the ones that matter most:
PreToolUse: Fires BEFORE any tool runs. This is your security gate. If you want to block a command, inspect a file write, or prevent an action, this is where you do it. Your hook can read what Claude is about to do and decide whether to allow it (exit 0) or block it (exit 2).
PostToolUse: Fires AFTER a tool succeeds. This is for cleanup and enforcement. Run a formatter on the file Claude just edited. Run a linter. Log the action. You cannot undo what already happened (the tool already ran), but you can make sure the result meets your standards.
Stop: Fires when Claude is about to declare itself done. This is your quality gate. Run the test suite. Run type checking. If anything fails, exit 2 and Claude will go back and fix it instead of stopping.
UserPromptSubmit: Fires when you press enter on a prompt. Useful for prompt validation or logging.
Notification: For desktop alerts. Wire it up to osascript on Mac or notify-send on Linux and you get a notification whenever Claude wants your attention.
SessionStart / SessionEnd: For setup and cleanup. Inject context at the start, clean up temp files at the end.
For tool events (PreToolUse and PostToolUse), you can use a matcher field to narrow which tools trigger the hook. "Write|Edit|MultiEdit" targets only file changes. "Bash" targets only shell commands. If you leave out the matcher, the hook fires for everything.
All hooks receive a JSON payload on stdin that tells them exactly what Claude is doing. The payload includes the tool name, the arguments, and other context. Your hook script reads this, makes a decision, and exits with the appropriate code.
PART 13: BUILDING A BASH FIREWALL HOOK
This is the most useful hook you can build. It inspects every bash command Claude wants to run and blocks anything dangerous before it executes.
First, create the script. Put it in .claude/hooks/bash-firewall.sh:
#!/bin/bash
Read the JSON payload from stdin
INPUT=$(cat)
Extract the command Claude wants to run
COMMAND=$(echo "$INPUT" | jq -r '.tool_input.command // empty')
If we could not extract a command, allow it (not a bash action)
if [ -z "$COMMAND" ]; then exit 0 fi
List of patterns to block
BLOCKED_PATTERNS=( "rm -rf /" "rm -rf ~" "rm -rf ." "git push --force" "git push -f" "git checkout main" "git checkout master" "git reset --hard" "DROP TABLE" "DROP DATABASE" "truncate" "mkfs" "> /dev/sda" "chmod 777" "curl.| bash" "wget.| bash" )
Check each pattern
for pattern in "${BLOCKED_PATTERNS[@]}"; do if echo "$COMMAND" | grep -qi "$pattern"; then echo "BLOCKED: Command matches dangerous pattern: $pattern" >&2 echo "Command was: $COMMAND" >&2 exit 2 fi done
If nothing matched, allow it
exit 0
Make it executable: chmod +x .claude/hooks/bash-firewall.sh
Then reference it in your settings.json:
{ "hooks": { "PreToolUse": [ { "matcher": "Bash", "hooks": [ { "type": "command", "command": "$CLAUDE_PROJECT_DIR/.claude/hooks/bash-firewall.sh" } ] } ] } }
Now every time Claude tries to run a bash command, this script fires first. If the command matches any of the dangerous patterns, it gets blocked with exit code 2 and Claude receives the error message so it can choose a safer approach.
PART 14: AUTO-FORMAT HOOK (PostToolUse)
This hook runs your code formatter automatically every time Claude writes or edits a file. No more telling Claude to "run prettier." It just happens.
Create .claude/hooks/auto-format.sh:
#!/bin/bash
INPUT=$(cat)
Extract the file path that was just modified
FILE_PATH=$(echo "$INPUT" | jq -r '.tool_input.file_path // empty')
if [ -z "$FILE_PATH" ]; then exit 0 fi
Only format files that exist and have relevant extensions
if [ -f "$FILE_PATH" ]; then case "$FILE_PATH" in .ts|.tsx|.js|.jsx|.json|.css|*.md) npx prettier --write "$FILE_PATH" 2>/dev/null ;; *.py) black "$FILE_PATH" 2>/dev/null ;; esac fi
exit 0
Make it executable and add it to settings.json:
{ "hooks": { "PostToolUse": [ { "matcher": "Write|Edit|MultiEdit", "hooks": [ { "type": "command", "command": "$CLAUDE_PROJECT_DIR/.claude/hooks/auto-format.sh" } ] } ] } }
Now every file Claude touches gets formatted automatically. The matcher "Write|Edit|MultiEdit" ensures this only fires on file modification tools, not on every tool call.
PART 15: TEST ENFORCEMENT HOOK (Stop)
This is the quality gate. When Claude says "I am done," this hook runs your test suite. If tests fail, Claude gets sent back to fix the problem instead of stopping.
Create .claude/hooks/enforce-tests.sh:
#!/bin/bash
INPUT=$(cat)
Check if this is already a retry to prevent infinite loops
STOP_HOOK_ACTIVE=$(echo "$INPUT" | jq -r '.stop_hook_active // false')
if [ "$STOP_HOOK_ACTIVE" = "true" ]; then
This is the second attempt. Let Claude stop even if tests still fail.
Otherwise we get an infinite loop.
exit 0 fi
Run the test suite
npm run test 2>&1
if [ $? -ne 0 ]; then echo "Tests are failing. Please fix the failing tests before finishing." >&2 exit 2 fi
Run type checking
npx tsc --noEmit 2>&1
if [ $? -ne 0 ]; then echo "TypeScript type errors found. Please fix them before finishing." >&2 exit 2 fi
exit 0
The stop_hook_active check is critical. Without it, here is what happens: Claude finishes, the hook runs tests, tests fail, Claude tries to fix them, Claude finishes again, the hook runs tests again, they still fail, and you are stuck in an infinite loop. The flag tells you this is the second attempt so you can let Claude stop gracefully.
Add it to settings.json:
{ "hooks": { "Stop": [ { "hooks": [ { "type": "command", "command": "$CLAUDE_PROJECT_DIR/.claude/hooks/enforce-tests.sh" } ] } ] } }
PART 16: THE SKILLS/ FOLDER (REUSABLE WORKFLOWS)
Skills are workflows that Claude can invoke on its own when the task matches the skill's description. Think of them as packages of instructions that activate automatically when relevant.
Each skill lives in its own subdirectory inside .claude/skills/ with a SKILL.md file:
.claude/skills/ security-review/ SKILL.md DETAILED_GUIDE.md deploy/ SKILL.md templates/ release-notes.md
The SKILL.md file uses YAML frontmatter to describe when to use it and what tools it needs:
The key difference between skills and rules: rules load passively based on file paths. Skills are active workflows that Claude invokes when it recognizes a matching task. Rules say "here are the standards." Skills say "here is how to do a specific job."
The other key difference between skills and simple commands: skills can bundle supporting files alongside them. A command is a single file. A skill is a package. You can include reference documents, templates, checklists, and anything else the skill needs to do its job well.
Personal skills go in ~/.claude/skills/ and are available across all your projects.
PART 17: BUILDING YOUR FIRST SKILL
Here is a practical example. Let us build a security review skill that Claude can invoke whenever you ask it to review code for vulnerabilities.
Create .claude/skills/security-review/SKILL.md:
name: security-review description: Comprehensive security audit. Use when reviewing code for vulnerabilities, before deployments, or when the user mentions security. allowed-tools: Read, Grep, Glob
Analyze the codebase for security vulnerabilities:
- SQL injection and XSS risks
- Check all database queries for parameterization
- Check all rendered output for proper escaping
- Look for innerHTML or dangerouslySetInnerHTML usage
- Exposed credentials or secrets
- Scan for hardcoded API keys, passwords, tokens
- Check that .env files are in .gitignore
- Look for secrets in commit history
- Insecure configurations
- Check CORS settings
- Verify HTTPS enforcement
- Look for debug mode left on in production configs
- Authentication and authorization gaps
- Verify all protected routes have auth middleware
- Check for broken access control (can user A see user B's data?)
- Look for missing rate limiting on auth endpoints
- Input validation
- Verify all user input is validated before use
- Check file upload handling for type and size validation
- Look for path traversal vulnerabilities
Report findings with severity ratings (Critical, High, Medium, Low) and specific remediation steps for each issue.
Reference @DETAILED_GUIDE.md for our internal security standards.
Now create .claude/skills/security-review/DETAILED_GUIDE.md with your team's specific security standards, approved libraries, and compliance requirements. The @DETAILED_GUIDE.md reference in the skill file pulls this document in automatically when the skill runs.
When you say "review this PR for security issues" or "do a security audit on the auth module," Claude reads the skill description, recognizes it matches, and runs the full workflow automatically. You can also invoke it explicitly with /security-review.
PART 18: THE AGENTS/ FOLDER (SPECIALIZED SUBAGENTS)
When a task is complex enough to benefit from a dedicated specialist, you can define a subagent persona in .claude/agents/. Each agent is a markdown file with its own system prompt, tool access, and model preference.
Agents are different from skills in an important way. A skill is a workflow that runs in your main conversation. An agent spawns in its own isolated context window, does its work independently, compresses the findings, and reports back to your main session. Your main conversation does not get cluttered with thousands of tokens of intermediate exploration.
Agents live in .claude/agents/:
.claude/agents/ code-reviewer.md security-auditor.md test-writer.md documentation-writer.md
PART 19: BUILDING YOUR FIRST AGENT
Here is a code-reviewer agent that Claude can spawn when it needs a thorough code review:
Create .claude/agents/code-reviewer.md:
name: code-reviewer description: Expert code reviewer. Use PROACTIVELY when reviewing PRs, checking for bugs, or validating implementations before merging. model: sonnet tools: Read, Grep, Glob
You are a senior code reviewer with a focus on correctness and maintainability.
When reviewing code:
- Flag bugs and logic errors, not just style issues
- Suggest specific fixes with code examples, not vague improvements
- Check for edge cases and error handling gaps
- Look for potential null/undefined issues
- Verify that error messages are helpful for debugging
- Check that functions do one thing and do it well
- Note performance concerns only when they matter at scale
- Verify that new code has corresponding tests
- Check for proper TypeScript types (no any, no type assertions without justification)
Format your review as:
- CRITICAL (must fix before merge)
- IMPORTANT (should fix, but not blocking)
- SUGGESTIONS (nice to have, optional)
For each finding, include:
- The file and line
- What the problem is
- Why it matters
- A specific fix
The tools field restricts what the agent can do. A code reviewer only needs Read, Grep, and Glob. It has no business writing or editing files. That restriction is intentional. A security auditor should not be able to write files. A documentation writer should not be able to run bash commands. Be explicit about what each agent can and cannot do.
The model field lets you pick which model runs the agent. Use a cheaper, faster model like haiku for focused read-only tasks like code review. Save sonnet or opus for work that requires deeper reasoning or writing complex code. Not every task needs the most expensive model.
Personal agents go in ~/.claude/agents/ and work across all your projects.
PART 20: THE GLOBAL ~/.claude/ FOLDER
This folder lives in your home directory and affects every Claude Code session across every project.
~/.claude/CLAUDE.md: Your global instructions. Things you want Claude to know regardless of which repo you are in. This might be your personal coding philosophy, your preferred patterns, or quirks about your setup.
Example:
Global preferences
- I prefer functional patterns over class-based when possible
- Always write TypeScript types before implementing functions
- When suggesting imports, prefer named imports over default imports
- I use VS Code with Vim keybindings, so keyboard shortcut references should reflect that
- When explaining code, start with the "why" before the "how"
- I prefer explicit over implicit, even if it means more code
~/.claude/settings.json: Your global settings and hooks. A notification hook configured here fires across all projects so you always get desktop alerts when Claude needs your attention.
~/.claude/skills/: Personal skills available across all projects. If you have a workflow you use everywhere (like your personal deployment process or a documentation template), put it here.
~/.claude/agents/: Personal agents available across all projects.
~/.claude/projects/: This is where Claude stores session transcripts and auto-memory per project. You generally do not need to manage this directly, but it is useful to know it exists.
PART 21: AUTO-MEMORY AND SESSION HISTORY
Claude Code automatically saves notes to itself as it works. When it discovers a command it needs, figures out a pattern in your codebase, or learns something about your architecture, it writes it down in ~/.claude/projects/.
These notes persist across sessions. So when you start a new conversation tomorrow, Claude already knows that "npm run test:integration requires the Docker containers to be running" because it figured that out yesterday and wrote it down.
You can view and edit Claude's memory with the /memory command. If Claude has picked up something wrong or you want to wipe its memory for a project and start fresh, this is where you do it.
Most of the time you do not need to think about auto-memory at all. Just know that it is happening in the background, and if Claude ever seems to "remember" something you never explicitly told it, this is why.
PART 22: THE FULL FOLDER STRUCTURE (COMPLETE MAP)
Here is everything in one view so you can see how it all fits together:
your-project/ CLAUDE.md # Team instructions (committed to git) CLAUDE.local.md # Your personal overrides (gitignored)
.claude/
settings.json # Permissions, hooks, config (committed)
settings.local.json # Personal permission overrides (gitignored)
hooks/ # Hook scripts referenced by settings.json
bash-firewall.sh # PreToolUse: block dangerous commands
auto-format.sh # PostToolUse: format files after edits
enforce-tests.sh # Stop: ensure tests pass before finishing
rules/ # Modular instruction files
code-style.md # Loaded always
testing.md # Loaded always
api-conventions.md # Loaded only for API files (path-scoped)
frontend-rules.md # Loaded only for component files (path-scoped)
security.md # Loaded always
skills/ # Auto-invoked workflows
security-review/
SKILL.md
DETAILED_GUIDE.md
deploy/
SKILL.md
templates/
release-notes.md
agents/ # Specialized subagent personas
code-reviewer.md
security-auditor.md
test-writer.md
~/.claude/ CLAUDE.md # Your global instructions (all projects) settings.json # Your global settings + hooks (all projects) skills/ # Your personal skills (all projects) agents/ # Your personal agents (all projects) projects/ # Session history + auto-memory (auto-managed)
PART 23: STEP-BY-STEP SETUP FROM SCRATCH
If you are starting from zero, here is the order that gets you the most value with the least effort.
Step 1: Create CLAUDE.md
Run /init inside Claude Code. It generates a starter CLAUDE.md by reading your project. Then edit it down to the essentials: build commands, architecture notes, conventions, and gotchas. Keep it under 50 lines if you can.
Step 2: Create .claude/settings.json
Add your allow and deny lists. At minimum: allow your run commands (npm run *, make *, etc.), allow read-only git commands, allow file operations. Deny .env reads, deny destructive shell commands, deny network commands you do not want Claude running.
Step 3: Add the bash firewall hook
Copy the bash-firewall.sh script from Part 13. Make it executable. Add the PreToolUse hook config to your settings.json. This single hook prevents the worst-case scenarios.
Step 4: Add the auto-format hook
Copy the auto-format.sh script from Part 14. Add the PostToolUse hook config. Now every file Claude touches gets formatted automatically.
Step 5: Add the test enforcement hook
Copy the enforce-tests.sh script from Part 15. Add the Stop hook config. Claude cannot declare "done" until tests pass.
Step 6: Start splitting rules
As your CLAUDE.md grows past 50 lines, start moving sections into .claude/rules/ files. Scope them by path where it makes sense. Keep CLAUDE.md for the universal essentials.
Step 7: Add personal global config
Create ~/.claude/CLAUDE.md with your personal preferences that apply across all projects. This is optional but nice to have.
Step 8: Build skills and agents as needed
These come later, once you have recurring complex workflows worth packaging up. Most people do not need them in the first few weeks. When you find yourself giving Claude the same multi-step instructions for the third or fourth time, that is when you turn it into a skill.
That is the full progression. Steps 1 through 3 take about 15 minutes and give you 80% of the value. Steps 4 through 8 are refinements you add over time.
PART 24: COMMON MISTAKES AND HOW TO FIX THEM
Mistake 1: Writing a 400-line CLAUDE.md Claude's instruction adherence drops when the file gets too long. Keep it under 200 lines, ideally under 50. Move detailed instructions into .claude/rules/ files.
Mistake 2: Using exit code 1 instead of exit code 2 in security hooks Exit 1 logs an error but does not block the action. Exit 2 blocks it. If your bash firewall uses exit 1, it is doing nothing useful. Always use exit 2 to actually prevent dangerous commands.
Mistake 3: Not checking stop_hook_active in Stop hooks Without this check, your Stop hook can create an infinite loop: Claude finishes, hook fails, Claude retries, hook fails again, forever. Always check the flag and let Claude stop on the second attempt.
Mistake 4: Putting everything in CLAUDE.md instead of using rules One massive file is harder to maintain, harder to review in PRs, and harder to scope. Split by concern. Use path scoping. Let different team members own different rule files.
Mistake 5: Not using the allow list enough If Claude asks for permission to run npm run test every single time, you are wasting your own time. Add it to the allow list. Be generous with safe, non-destructive commands that Claude needs to do its job.
Mistake 6: Forgetting that hooks do not hot-reload If you change a hook script or hook config during a session, Claude does not pick up the changes until the next session. Hooks are snapshotted at session start. If you are testing a hook, you need to restart your Claude Code session to see the changes.
Mistake 7: Not making hook scripts executable If you create a .sh file but forget to chmod +x it, the hook will fail silently. Always make your hook scripts executable after creating them.
Mistake 8: Duplicating linter/formatter config in CLAUDE.md Claude can read your .eslintrc and .prettierrc. Do not copy those rules into CLAUDE.md. It wastes context and creates a maintenance problem when the config changes but the CLAUDE.md does not.
Mistake 9: Giving agents too many tools A code reviewer does not need write access. A security auditor does not need bash access. Be explicit about the minimum set of tools each agent needs. Fewer tools means fewer ways for the agent to make mistakes.
Mistake 10: Never looking at auto-memory Claude is writing notes to itself about your project all the time. Sometimes it picks up something wrong. Use /memory periodically to review what Claude thinks it knows about your project and correct anything inaccurate.
You just read the full playbook. Most people will close this tab and never implement it. The ones who do usually hit a wall around the technical setup and quit.
Inside the Skool, I walk you through the exact build step-by-step, troubleshoot your setup live in the community, and share the scripts and templates I use to actually land paying clients.
If you want the shortcut instead of the long way around: